- This topic has 0 replies, 1 voice, and was last updated 5 years, 9 months ago by
 CLOC-Admin.
- Topic
- CLOC-AdminLooking for some suggestions from owners who made the change. I’m putting disc brakes on my trailer and was wondering where you located the the pump and where you ran the lines back to the axle? Also where do the lines from the plug run into the trailer? I can’t see them from the front storage compartment. Thanks for your assistance.Posted: 2:08 PM – Aug 16, 2016Yukon,
I had a bracket welded onto the frame above the battery box so it was out of the way. Boy, am I always glad that I did.
Let me get some photos posted. Also how the brake lines exits next to the big foot and runs down the off-curb side, i.e., drivers side.
Wiring enters the rig on the floor in the forward clothes closet. There is a little triangle box of wood covering it. Back in the forward storage the brake wiring
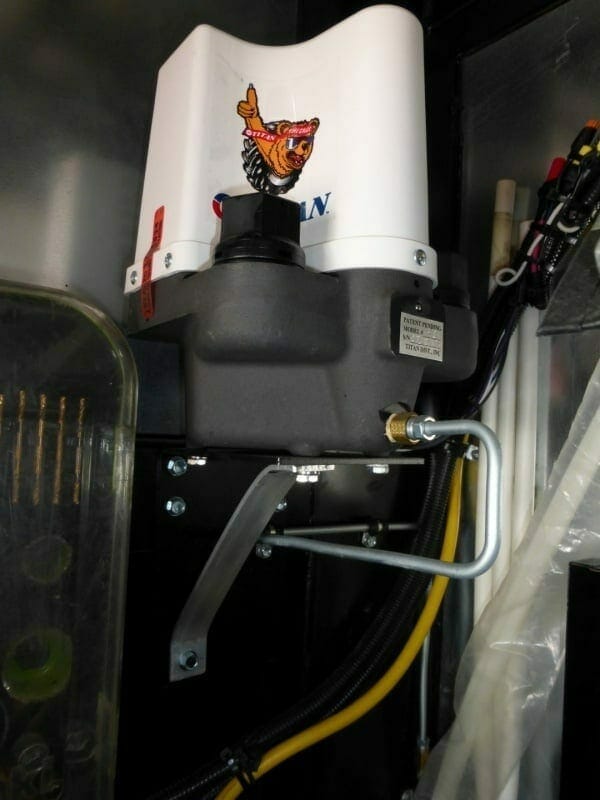
Posted: 12:31 PM – Aug 18, 2016On our 32fws, we pulled the big foot controls off the side of the coach and fished the wire through there and made the connections next to the heater. Ran the brake line same as JohnD222. Mounted the unit inside front compartment on driver side floor.Posted: 3:16 PM – Aug 18, 2016If you are getting the Titan pump, it has an optional bracket. It allowed up to mount the pump up high on the side in the front basement compartment. It was great. Kept the floor clear and all the wires running to the pump out of the way. LS installed the Dexter pump on the floor. I hate it. Its in the way and I have had to construct a vented box around it to keep from damaging it.Posted: 4:07 PM – Aug 18, 2016As jdpm said, the Titan pump is easily mounted up high in the front bay. I mounted mine on the upper left side using their bracket. Great pump, by the way.I will post a pic as soon as I can log in again to the owners club area.
Posted: 9:08 PM – Aug 18, 2016 Posted: 6:15 PM – Aug 21, 2016I am getting the titan pump with mounting bracket. What did you do with the excess line? Being only 32′ I will have about 7′ to 8 ‘ of excess line. While running the line from the pump back to the axles did you run it on the bottom of the frame or some other location?
Thanks.
Posted: 6:43 PM – Aug 21, 2016Bottom of frame. Remove some of the self tapping 1/4 inch head screws that hold the aluminum furring strips that hold the belly fabric/plastic in place. I trust that you get rubber bushings inside clips to hold the line. The should have the proper eyelet for those screws and brake line.I would start at the back and move forward, using a tubing bender. Unlike water and gas lines, in brake lines, there is usually a double flare that is tough to replicate. So I would tend to just find a place in the front to loop a longer line horizontally a couple of times. That said, several have suggested that they get better brake performance (less delay) if they upsize that main run. NAPA carries some long runs, and can special order longer ones. Unions and a few double ended pieces may make it easier.
Posted: 10:37 PM – Aug 21, 2016If this is a DIY project Auto Zone rents tools like a bubble flair tool and brake line comes in a copper type that never rusts and bends without tools, your hands will do. Please try not to use unions do it with one continuous line the right length. If possible with the correct flair fittings you can go with bigger line and I would recommend it, more volume equals better stopping power.Posted: 1:51 AM – Aug 22, 2016My Kodiak kit came with rubber lines and was very easy to install. Disc brakes are the best upgrade you can do !!Posted: 5:47 AM – Aug 22, 2016moo2613 could you give me more detail where you found the wires to tap into? I haven’t been able to find where the wiring bundle comes into the trailer from the pln conection. I believe 32fws is different than the 36fws but can’t find the conections or where the current brake line enters the frame at the front of the trailer.Posted: 7:09 AM – Aug 29, 2016Job done! Thanks for all the suggestions and the photos, especially retiredfields, I never thought of mounting the pump on the passenger (door) side, which worked out great. New axles with brakes and springs already installed from Dexter (8 bolts and all running gear was installed) with a Titan pump and hose kit made the job easier to do (it’s still a lot of work). I got my parts from Bill at stopyourtrailer.com who was easy and helpfull to work with.Posted: 7:16 AM – Aug 29, 2016If your truck has setting for hydraulic versus electric, change the setting.If after several days of travel you find that you have a slight delay in brake activation, try bleeding the lines again, but replenish the reservoir frequently- don’t let the master go dry.
Posted: 12:02 PM – Sep 05, 2016Bleeding the brakes. Just finished the routine myself.While the Carlisle actuator looks like it holds a lot of fluid, it does not. You can only bleed out 3 ounces before you need to refill. Go past that and it will run dry and you need to start all over at the beginning, including bleeding the master – ask me how I know…
It took a full quart to refresh all of the 5 year old fluid. Good thing that I bought 2 because I used most of the first running it dry a couple of times.
NAPA sells large 3 ounce bleeder cup with several hose adapters to make bleeding go faster/easier. About $12. Don’t try to fill a second before replenishing the actuator. And don’t waste your money on the cheap 1 ounce needle point setup.
B.W.Gentry
Owner/Admin
2007 Carri-Lite XTRM5
Breckenridge, TX

- You must be logged in to reply to this topic.